Fix Black Screen on Acer Nitro 5 Laptop

 How to Fix Black Screen on Acer Nitro 5 Laptop: 3 Easy Steps

The Acer Nitro 5 laptop is a powerful gaming device known for its impressive performance and sleek design. However, like any other electronic device, it is not free from potential issues. One common problem that users may encounter is a black screen. This can be a frustrating experience, especially when you are in the middle of an intense gaming session or need to complete an important task. But worry not! We will guide you through three easy steps to fix the black screen issue on your Acer Nitro 5 laptop.


I. Remove the Laptop Battery and Let it Sit for 5 Minutes, Then Plug it Back In


The first step in troubleshooting the black screen problem on your Acer Nitro 5 laptop is to remove the battery. This action will help you reset the power supply and potentially resolve any temporary electrical glitches causing the black screen issue. 

Here's what you need to do:

1. Turn off your laptop by holding down the power button for about 10 seconds until it shuts down completely.

2. Disconnect the power adapter from the laptop.

3. Close the lid of your Acer Nitro 5 laptop.

4. Flip your laptop over and locate the battery release latch or switch.

5. Slide or push the latch or switch in the direction indicated to unlock the battery.

6. Remove the battery from the laptop by pulling it out gently.

7. Leave the battery out and let your laptop sit for around 5 minutes.

8. After the elapsed time, put the battery back into its compartment and make sure it is securely locked.

9. Connect the power adapter to your Acer Nitro 5 laptop.

10. Open the lid and press the power button to turn on your laptop.

By following these steps, you have successfully executed a power reset, which often resolves black screen issues caused by temporary power irregularities. If your Acer Nitro 5 laptop still displays a black screen, proceed to the next step.


II. Remove the Laptop RAM and Clean the RAM Using Rubber


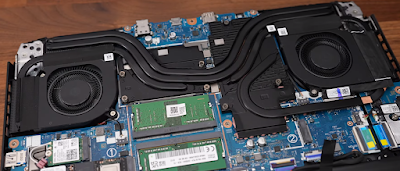
If the first step did not solve the black screen problem on your Acer Nitro 5 laptop, the issue might be related to the RAM. RAM, or Random Access Memory, is a crucial component responsible for storing data that the laptop's processor needs to access quickly. Over time, the RAM can accumulate dust and debris, causing connectivity issues and potentially leading to a black screen error. Cleaning the RAM can help resolve this problem. Here's how you can do it:


1. Switch off your Acer Nitro 5 laptop and unplug the power adapter.

2. Locate the RAM compartment. On the Acer Nitro 5 laptop, it is typically situated on the bottom side of the device, secured by a small panel.

3. Unscrew or unlatch the panel to gain access to the RAM slots.

4. Gently remove the RAM module(s) from their slot(s). Be cautious while doing this to avoid damaging the RAM or other internal components.

5. Once the RAM module(s) is removed, take a soft rubber eraser and carefully rub the golden contacts on both sides of the RAM. This action will help clean any dust or residue hindering proper connectivity.

6. After you have cleaned the RAM modules, insert them back into their respective slots firmly but gently. Ensure that they are seated properly and securely.

7. Replace the panel and secure it back into place using the screws or latches.

8. Reconnect the power adapter and turn on your Acer Nitro 5 laptop.

By cleaning the RAM, you have potentially resolved any issues caused by dusty or improperly connected memory modules. If your laptop's black screen problem persists, proceed to the next step.


Remove the Laptop RAM and Clean the RAM Using Rubber


III. Connect to an External Monitor or TV


If both previous steps failed to fix the black screen issue on your Acer Nitro 5 laptop, there may be an underlying problem with the laptop's display or graphics card. To confirm this, you can try connecting your laptop to an external monitor or a TV. By doing so, you can determine whether the issue lies with the laptop's internal components or the screen itself. Here's how you can proceed:

1. Locate the HDMI or VGA port on your Acer Nitro 5 laptop. This port may vary depending on the model but is typically found on the sides or back of the device.

2. Connect one end of an HDMI or VGA cable to the appropriate port on your laptop.

3. Connect the other end of the cable to the HDMI or VGA input of your external monitor or TV.

4. Turn on the external monitor or TV and switch to the appropriate input source.

5. Power on your Acer Nitro 5 laptop.

6. If the external monitor or TV displays the laptop's screen correctly, it indicates that there might be an issue with the laptop's built-in display or graphics card.

At this stage, we recommend seeking professional assistance from an authorized Acer service center or a professional technician. They will be able to diagnose and fix the underlying issue with your laptop.

The Acer Nitro 5 laptop is a reliable gaming device, but it is not immune to occasional problems such as the black screen issue. By following the three steps outlined in this article, you can troubleshoot the issue on your own and potentially resolve it. Remember to first power reset your laptop by removing the battery, letting it sit, and plugging it back in. If that doesn't work, clean the RAM by removing and gently rubbing the contacts with a rubber eraser. Finally, if all else fails, connect your laptop to an external monitor or TV to determine if the problem lies with the internal display or graphics card. With these simple steps, you can get your Acer Nitro 5 laptop up and running again in no time.


Fixing the "No Bootable Device" Issue on Acer Nitro 5 Laptop

The "No Bootable Device" error is a common problem encountered by Acer Nitro 5 laptop users. This issue can be quite frustrating as it prevents the laptop from starting up properly and accessing the operating system. Fortunately, this issue can often be resolved by following a few simple troubleshooting steps. In this guide, we will provide a step-by-step solution to fix the "No Bootable Device" error on an Acer Nitro 5 laptop.


I.  Setting BIOS Default

1. Start by turning off your Acer Nitro 5 laptop.

2. Press the power button to turn it on and immediately start tapping the F2 or Del key repeatedly until the BIOS Setup Utility appears.

3. Once in the BIOS Setup Utility, navigate using the arrow keys and look for the "Load Default Settings" option.

4. Select "Load Default Settings" and press Enter.

5. Save the changes by selecting "Save and Exit" or pressing the F10 key.


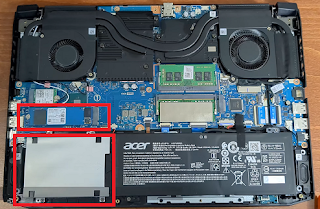
II. Cleaning the HDD or SSD Connector

1. Turn off your laptop and unplug any cables.

2. Flip the laptop over and locate the compartment cover that houses the hard drive (HDD) or solid-state drive (SSD).

3. Unscrew the screws securing the compartment cover and carefully remove it.

4. Gently detach the HDD or SSD connector cable from its slot on the motherboard.

5. Clean the connectors on both the cable and the drive using a soft, lint-free cloth.

6. Reconnect the cable securely to the drive and ensure it is properly seated in the slot.

7. Reattach the compartment cover and tighten the screws.


Fixing the "No Bootable Device" Issue on Acer Nitro 5 Laptop


III. Replacing a Damaged HDD or SSD

1. If the previous steps did not fix the issue, it is possible that your HDD or SSD is damaged and needs to be replaced.

2. Obtain a new compatible HDD or SSD for your Acer Nitro 5 laptop.

3. Turn off your laptop and follow the steps mentioned in Step 2 to access the compartment cover.

4. Disconnect the damaged HDD or SSD by removing the connector cable.

5. Carefully remove the faulty drive from its slot.

6. Insert the new HDD or SSD into the slot and connect it securely using the connector cable.

7. Reattach the compartment cover, ensuring it is properly aligned, and tighten the screws.


Experiencing a "No Bootable Device" error on your Acer Nitro 5 laptop usually can be resolved by following the steps outlined above. Starting with setting BIOS defaults, then proceeding to clean the HDD or SSD connector, and finally replacing the faulty drive if necessary, these troubleshooting steps aim to provide a comprehensive solution. By following these steps carefully, you should be able to fix the "No Bootable Device" error and have your Acer Nitro 5 laptop up and running again.


Fix How to Optimize Acer Nitro 5 for Gaming

Steps to Optimize Acer Nitro 5 for Gaming: Unleash the Full Power


The Acer Nitro 5 is a budget-friendly gaming laptop that provides remarkable gaming performance. However, like any computer, it can benefit from optimization to achieve the best gaming experience possible. This article will guide you through the process of optimizing your Acer Nitro 5, enhancing its gaming capabilities, and overcoming any performance limitations it may have. By following these steps, you can maximize your laptop's potential, ensuring smoother gameplay and improved frame rates.

1. Update Drivers and Firmware

To start optimizing your Acer Nitro 5 for gaming, it's crucial to keep your laptop's drivers and firmware up to date. Manufacturers often release updates that improve system stability, enhance graphics performance, and address known issues. Visit Acer's official support website and search for the latest drivers and firmware designed for your Nitro 5 model. Download and install these updates, ensuring compatibility and adequate system performance.

2. Remove Unnecessary Software and Disable Startup Programs

Many Acer Nitro 5 laptops come with pre-installed software that may consume system resources and affect gaming performance. Identify and uninstall any unnecessary third-party applications that you don't use regularly. Additionally, disable any unnecessary startup programs that run in the background, eating up system resources. This step will free up precious memory and processing power, allowing your laptop to allocate more resources to gaming.

3. Optimize Windows Settings

Windows settings can significantly impact gaming performance. Adjusting certain settings can enhance the framerate, reduce input lag, and optimize overall gameplay. Here are some key settings worth optimizing:

a) Power Options. Change your laptop's power plan to "High Performance" to ensure maximum performance during gaming sessions.

b) Visual Effects. Disable visual effects or reduce them to the minimum to allocate more GPU resources to gaming.

c) Background Processes. Ensure that unnecessary background processes are terminated or minimized to free up system resources.

d) Game Mode. Enable the Game Mode feature offered by Windows, which optimizes system settings for gaming.

4. Optimal Graphics Settings

To achieve the best visual experience while maintaining smooth gameplay, it's important to find the sweet spot for graphics settings in each game you play. Although the Nitro 5 can handle most games, tweaking individual game settings can further optimize performance. Lowering anti-aliasing, shadows, and unnecessary effects can significantly boost FPS. Additionally, adjusting resolution and texture quality according to your laptop's capabilities can strike a balance between visual quality and performance.


5. Regular System Maintenance

Performing regular system maintenance is vital to keep your Acer Nitro 5 running smoothly. Clean the laptop's cooling system and ensure proper airflow to prevent overheating, as excessive heat can lead to performance throttling. Use compressed air to remove dust from the intake and exhaust vents. Additionally, consider investing in a cooling pad to further reduce temperatures during intense gaming sessions.

Optimize Acer Nitro 5 for Gaming

6. Optimize RAM

Most versions of the Acer Nitro 5 come with a standard 8GB of RAM, which is sufficient for basic gaming. However, if you want to maximize your gaming experience and ensure smooth gameplay, it is highly recommended to upgrade the RAM to the maximum supported capacity, which is usually 16GB or 32GB depending on the model.

By upgrading the RAM, you will be able to handle more demanding games and multitask with ease. The increased memory will provide smoother gameplay, and faster loading times, and prevent any lag or stuttering issues. It allows you to run multiple programs simultaneously while gaming, such as streaming software or voice chat applications, without affecting the gaming performance.

To upgrade the RAM on your Acer Nitro 5, you will need to purchase compatible RAM modules that match the specifications of your laptop. It is advisable to buy RAM from reputable brands and ensure that it has the same frequency and voltage specifications as the existing RAM.

Once you have purchased the RAM, it is a straightforward process to install it. Simply remove the laptop's back panel, locate the existing RAM slots, carefully remove the old modules, and replace them with the new ones.

After installing the upgraded RAM, it is important to configure the laptop's BIOS settings to recognize the added memory. This can usually be done by restarting the laptop and pressing the appropriate key (e.g., Del, F2, or Esc) to access the BIOS menu, then navigating to the memory settings and making the necessary adjustments.

With the maximum recommended RAM upgrade, your Acer Nitro 5 will be better equipped to handle the latest games and ensure a smooth and enjoyable gaming experience. However, it is worth noting that RAM upgrades alone may not drastically improve performance if other components, such as the CPU or graphics card, are the bottleneck. Therefore, it is important to consider the overall system requirements and balance the upgrades accordingly.


Fix Acer Nitro 5 an515 57 Fan Problem

Acer Nitro 5 AN515-57 Laptop Fan Problem: Troubleshooting and Resolution

The Acer Nitro 5 AN515-57 laptop is a popular choice among gamers and tech enthusiasts due to its commendable performance and attractive features. However, like any other electronic device, it is susceptible to hardware issues. One recurring problem is related to the laptop's fan system. This article aims to provide an in-depth analysis of two common fan issues with the Acer Nitro 5 AN515-57 laptop: a fan that does not rotate or rotates slowly. Additionally, it explores possible troubleshooting steps and, if all else fails, the necessity of replacing the malfunctioning fan with a professional technician.


I. Fan Not Rotating:

The fan is an essential component of any laptop as it helps dissipate heat generated by internal components. When the fan fails to rotate, it can lead to overheating, causing performance degradation and potential damage to the laptop. Here are some troubleshooting steps to address this issue:


1. Check for Obstructions: The first step is to ensure that there are no visible obstructions hindering the fan's rotation, such as dust, debris, or wires. These obstructions can impede the fan's movement and prevent it from spinning properly.


2. Clean Fan and Vents: Over time, dust and debris can accumulate on the fan blades and vents, reducing airflow and causing the fan to seize or rotate slowly. Use compressed air or a soft brush to carefully clean the fan blades and vents, removing any accumulated dust.


3. Update BIOS and Drivers: Outdated BIOS and drivers can affect the fan's functionality. Visit Acer's official website and download the latest BIOS and driver updates specific to the Acer Nitro 5 AN515-57 laptop model. Install these updates and restart the laptop to see if the fan starts to rotate.


4. Reset Power Management Settings: Sometimes, incorrect power management settings can prevent the fan from spinning. Open the power management settings and ensure that the cooling policies are set to active cooling or maximum performance. This allows the fan to operate at its maximum potential.


5. Internal Inspection: If the aforementioned steps fail to resolve the issue, it might be necessary to open the laptop and inspect the fan assembly. Carefully remove the laptop's back panel, locate the fan, and check for any loose connections or damaged wires. If any issues are found, they should be carefully repaired, or the fan should be replaced by a professional technician.


II. Fan Rotating Slowly:

Another common problem with the Acer Nitro 5 AN515-57 laptop is a fan that rotates slowly. This issue can also lead to overheating and performance degradation. Here are some troubleshooting steps to resolve it:


1. Ensure Sufficient Power Supply: Inadequate power supply can cause the laptop fan to rotate slowly. Plug the laptop into a power source to ensure it is receiving the required power. Check the power cable and adapter for any damages or loose connections.


2. Adjust Power Management Settings: Similar to the issue of a non-rotating fan, incorrect power management settings can cause the fan to rotate slowly. Adjust the power plan settings to ensure maximum performance or active cooling mode, allowing the fan to operate at its full capacity.


3. Check CPU Usage: High CPU usage can overwork the laptop's cooling system, resulting in a slow-spinning fan. Open the Task Manager (Ctrl + Shift + Esc), go to the "Processes" tab, and identify any programs or processes using excessive CPU resources. Close unnecessary applications or consider upgrading hardware if the load is consistently high.


4. Update BIOS and Drivers: As mentioned earlier, outdated BIOS and drivers can adversely affect fan performance. Ensure that the Acer Nitro 5 AN515-57 laptop has the latest BIOS and driver updates installed by visiting Acer's official website.


5. Consider Professional Assistance: If the above steps do not resolve the issue, it indicates a potential hardware problem. In such cases, it is advised to seek professional assistance from a certified technician. They will be able to diagnose the problem accurately and provide appropriate solutions, which may include replacing the fan.


Fix Acer Nitro 5 an515 57 Fan Problem


Replace the laptop fan independently

Replacing the fan in your Acer Nitro 5 AN515-57 can be a relatively simple process, but it is important to follow all the steps carefully to ensure a smooth installation and prevent any damage to your laptop. In this guide, we will walk you through the process step-by-step. 

First, before beginning any work on your laptop, it is crucial to power it off and unplug it from the power source. This will avoid any potential risk of shock or damage to the internal components. 

Once your laptop is powered off and unplugged, you can proceed with removing the back cover. This is usually secured with a few screws. You will need to locate and unscrew all the screws, keeping them in a safe place to ensure they are not lost. 

Once the screws are removed, carefully lift off the back cover. You may encounter some resistance due to clips or adhesive, so take your time and gently pry it loose, making sure not to force it. 

Next, locate the fan inside the laptop. It is usually positioned near the vent, as it is responsible for cooling the internal components. You will need to disconnect the fan's power cable from the motherboard. This cable can be gently pulled away from the connector, but be careful not to pull on the wires themselves, as this can cause damage. 

After disconnecting the power cable, you can proceed with removing the screws that secure the fan in place. These screws may vary in number and size, so pay attention to their specific placement. Once all the screws are removed, you can gently lift the fan out of its housing.

Now that the old fan is removed, it is time to install the new one. Start by carefully placing the new fan into the housing. Ensure that it sits securely and aligns with the screw holes. 

Once the new fan is positioned correctly, you can reattach the screws to secure it in place. Be sure to tighten the screws evenly, but avoid overtightening, as this can damage the fan or the laptop's housing. 

After securing the fan, you need to reconnect the power cable to the motherboard. Gently insert the connector into the corresponding slot, ensuring it connects firmly. 

With the fan installed and the power cable reconnected, it is time to put the back cover back on. Carefully align the cover with the laptop's frame and press it into place. If you encounter any resistance, double-check that all the screws are removed and that there is no debris obstructing the way. 

Once the back cover is securely in place, you can proceed to screw it back on. Remember to use the original screws and tighten them just enough to ensure a snug fit. 

Finally, after the back cover is screwed on, you can plug your laptop back into the power source and power it on. Monitor the fan's performance to ensure it is functioning correctly and providing proper cooling to your laptop's internal components. 

Replacing the fan in your Acer Nitro 5 AN515-57 can help extend the lifespan of your laptop and ensure optimal performance. By following these steps carefully, you can achieve a successful fan replacement without any complications. However, if you are not comfortable performing this task yourself, it is always recommended to seek professional assistance to avoid any potential damage to your laptop.


[Solved] Fix Acer swift 3 Black Screen With Cursor

 Acer Swift 3 Laptop Black Screen With Cursor: Causes, Solutions, and Recovery Options


When an Acer Swift 3 laptop encounters a black screen with a cursor, several potential causes emerge, including a faulty HDD, problematic updates, or the need for a factory reset. This article delves into these causes, outlining the symptoms and solutions for each scenario, with a particular focus on upgrading to an SSD or conducting a factory reset to restore the laptop's functionality.

1. Introduction

The Acer Swift 3 laptop is a popular and reliable device, known for its sleek design, powerful performance, and extensive battery life. However, users may occasionally face a frustrating situation where their laptop screen turns black with only a cursor visible. In most cases, this issue arises due to a faulty HDD, conflicting updates, or the need for a factory reset. This article aims to provide insights into these possible causes, along with appropriate solutions and recovery options.


2. Black screen with cursor caused by a faulty HDD

One leading cause of the black screen issue is a problematic hard disk drive (HDD). Symptoms of a failing HDD include slow performance, frequent crashes, and a clicking noise coming from the laptop. To resolve this, replacing the old HDD with a solid-state drive (SSD) is recommended. An SSD offers increased speed, durability, and reliability compared to traditional HDDs.


[Solved] Fix Acer swift 3 Black Screen With Cursor


3. Black screen with cursor caused by faulty Windows updates

Another common cause is faulty or conflicting Windows updates. These updates can sometimes lead to compatibility issues, resulting in a black screen with a cursor. To address this, users can try troubleshooting steps like entering Safe Mode, rolling back updates, or performing a system restore to a previous stable state. Additionally, Microsoft provides specific tools like DISM and SFC to recover the system from errors caused by updates.


4. Recovery Options

a. Upgrade to an SSD

Upgrading the laptop's storage solution from an HDD to an SSD is an effective solution for multiple issues. The improved read and write speeds of an SSD enhance overall system performance, while the absence of moving parts makes it more resistant to physical damage. To conduct the upgrade, users should back up their data, obtain a compatible SSD, clone their HDD to the new SSD, and install it into their laptop following the manufacturer's instructions.


b. Factory reset

If the black screen issue persists despite HDD replacement or Windows update troubleshooting, a factory reset can serve as a last resort. This process restores the laptop to its original state, erasing all data, and reinstalling the operating system. Users should ensure their important files are securely backed up before initiating a factory reset. The exact steps may vary slightly depending on the laptop model, but generally, it involves accessing the recovery partition or using recovery media.


5. Precautions and Tips

a. Regular backups. To safeguard against data loss during an upgrade or factory reset, it is crucial to regularly back up all important files and documents.

b. Reliable source. When purchasing an SSD or utilizing recovery tools, ensure reliability by using trusted sources or seeking guidance from authorized Acer service centers or verified retailers.

c. Update drivers and BIOS. Keeping the laptop's drivers and BIOS up to date is essential for stable and optimized performance. Regularly check for updates from Acer's official website or through Acer Care Center software.


6. Conclusion:

By understanding the potential causes, such as a faulty HDD, conflicting Windows updates, or the need for a factory reset, users can take appropriate steps to rectify the situation. Whether it involves upgrading to an SSD for improved speed and reliability or initiating a factory reset to bring the laptop back to its original state, there are viable solutions available to recover the functionality of your Acer Swift 3 laptop.


[Solved] How to Fix Acer Nitro 5 Overheating

The Acer Nitro 5 is a popular gaming laptop that offers decent performance for its price range. However, like many laptops, it is prone to overheating, which can lead to reduced performance and possible damage to the internal components. In this article, we will discuss how to fix Acer Nitro 5 overheating issues through fan cleaning and changing the thermal paste.

Overheating is a common problem in laptops, especially gaming laptops, due to their powerful hardware components generating a significant amount of heat. The Acer Nitro 5 is equipped with an adequate cooling system, including two fans and heat sinks, to dissipate heat generated by the CPU and GPU. However, over time, dust buildup and the degradation of the thermal paste can hinder the cooling system's effectiveness, leading to overheating.

One of the primary causes of overheating in the Acer Nitro 5 is dust accumulation in the fans and heat sinks. Dust acts as an insulator, preventing proper airflow and heat dissipation. To fix this issue, you need to clean the fans and heat sinks regularly. 

Here's how you can do it:

1. Shut down your laptop and unplug it from the power source. It's essential to ensure the laptop is entirely off and not in sleep mode.

2. Flip the laptop over and remove the battery if it is removable. If the battery is not detachable, make sure the laptop is completely powered off and disconnected.

3. Use a small Phillips head screwdriver to remove the screws securing the bottom cover of the laptop. Keep these screws in a safe place.

4. Once the screws are removed, gently pry open the bottom cover using a plastic spudger or a thin tool to avoid damaging the plastic casing.

5. Locate the cooling fans and heat sinks. The fans are usually located towards the back of the laptop, near the air vents. The heat sinks are large metal structures that absorb and dissipate heat from the CPU and GPU.

6. Using a can of compressed air, blow air into the fans and heat sinks to remove any dust. Pay close attention to the fan blades and the spaces between the heat sink fins. This will help to dislodge the accumulated dust.

7. You may also use a soft brush, such as a clean paintbrush, to remove stubborn dust from the fans and heat sinks. Be gentle to avoid damaging any delicate components.

8. Once you have cleaned the fans and heat sinks, replace the bottom cover by aligning it with the screw holes and gently pressing it until it clicks into place.

9. Secure the cover using the screws you removed initially.


How to Fix Acer Nitro 5 Overheating


While cleaning the fans and heat sinks can significantly improve the cooling performance of your Acer Nitro 5, it is also important to check and replace the thermal paste. Thermal paste is a heat-conductive compound applied between the CPU/GPU and the heat sink. Over time, the thermal paste can dry out or become less efficient, leading to increased temperatures. 

Here's how you can change the thermal paste:

1. Follow the steps mentioned above to remove the bottom cover of the laptop and access the internal components.

2. Locate the CPU and GPU. They will be located under large metal heat sinks connected to heat pipes.

3. Unscrew the heat sink using the appropriate screwdriver. Note that some laptops may have multiple screws securing the heat sink.

4. Once the heat sink is detached, carefully lift it up to reveal the CPU and GPU.

5. Use a soft, lint-free cloth or isopropyl alcohol to clean off the old thermal paste from the CPU and GPU. Ensure that no residue is left behind.

6. Apply a small pea-sized amount of high-quality thermal paste to the center of the CPU and GPU. Do not spread it; the mounting pressure of the heat sink will evenly distribute the paste.

7. Reattach the heat sink carefully, aligning it with the CPU and GPU. Tighten the screws evenly but be cautious not to overtighten them.

8. Replace the bottom cover of the laptop, securing it with the screws you removed initially.

Changing the thermal paste is a slightly more advanced process and requires caution. If you are not confident in performing the task yourself, it is recommended to seek professional assistance.

Cleaning the fans and heat sinks, as well as replacing the thermal paste, can significantly improve the cooling performance of your Acer Nitro 5 and prevent it from overheating. Regular maintenance and monitoring of temperatures will help ensure optimal performance and longevity for your gaming laptop.


[SOLVED] Fix Acer ES1 Touchpad Not Working

The Acer ES1 Touchpad Not Working issue is a common problem that users face, especially after installing a new version of Windows or recovering the operating system. The touchpad is an essential input device for laptops, allowing users to navigate and control the cursor on the screen with ease. When it stops working, it can be frustrating and hinder productivity. In this article, we will explore some potential causes and solutions for this problem.

One of the first things to check when facing touchpad issues is the touchpad itself. Sometimes, the touchpad may be disabled accidentally, either through keyboard shortcuts or software settings. To check if it is disabled, you can press the Fn key (usually located at the bottom left of the keyboard) and one of the function keys (F1 to F12) that has a touchpad icon on it. This combination varies depending on the laptop model, so you may need to consult the user manual or manufacturer's website for the correct key combination.

If the touchpad is enabled, but still not working, the next step is to update the touchpad drivers. Outdated or incompatible drivers can often cause issues with functionality. You can download the latest touchpad drivers from the Acer website or use Windows Device Manager to update them. To access Device Manager, press the Windows key + X and select "Device Manager" from the menu. Look for the "Mice and other pointing devices" category and expand it. Right-click on the touchpad driver and select "Update driver." Follow the on-screen instructions to complete the update.

If updating the drivers doesn't resolve the issue, you can try reinstalling them. To do this, open Device Manager as mentioned earlier, right-click on the touchpad driver, and select "Uninstall device." Restart your laptop, and Windows should automatically reinstall the touchpad drivers. After the reinstallation, check if the touchpad is working correctly.

In some cases, the touchpad issue may be related to incorrect power settings. Windows has a feature called "Power Management" that can affect device functionality to conserve power. To check the power settings, go to Control Panel > Hardware and Sound > Power Options. Make sure you have selected a balanced or high-performance power plan rather than a power-saving one. Additionally, expand the "Change plan settings" option for your selected plan and ensure that the "On battery" and "Plugged in" settings have the touchpad set to "Maximum performance" or "Always on."

Another troubleshooting step is to boot your laptop in Safe Mode. This helps determine if the problem is caused by a third-party application conflicting with the touchpad. In Safe Mode, only essential Windows services and drivers are loaded, so if the touchpad works fine, it indicates a software conflict. To boot in Safe Mode, press the Windows key + R, type "msconfig," and hit Enter. In the System Configuration window, go to the "Boot" tab and check the "Safe boot" option. Select "Minimal" and click "OK." Restart your laptop, and it will boot into Safe Mode. Test the touchpad functionality in this mode. If it works, you may need to investigate and uninstall any recently installed programs or drivers that could be causing the conflict.

In some rare cases, the touchpad hardware itself may be faulty. If none of the above solutions work, and the laptop is still under warranty, it is advisable to contact Acer support or bring the laptop to an authorized service center for further inspection and repair.

In conclusion, the Acer ES1 Touchpad Not Working issue is a frustrating problem that can occur after installing a new version of Windows or recovering the operating system. However, with the help of these troubleshooting steps, you can often resolve the problem and restore full touchpad functionality. Remember to check for touchpad disablement, update/reinstall touchpad drivers, adjust power settings, boot in Safe Mode, and consider hardware inspection if necessary.


Fix Acer ES1 Touchpad Not Working


How to fix the Acer ES1 touchpad not working

1. Download and install drivers at the link below.

2. Restart your laptop

3. You can enable or disable the touchpad using the keyboard key (Fn + ( F3 ~ F8 ) key combination


DRIVERS

(( INSTALL )) Acer ES1-132 touchpad driver 

(( INSTALL )) Acer ES1-311 touchpad driver 

(( INSTALL )) Acer ES1-331 touchpad driver 

(( INSTALL )) Acer ES1-332 touchpad driver 

(( INSTALL )) Acer ES1-432 touchpad driver 

(( INSTALL )) Acer ES1-420 touchpad driver 

(( INSTALL )) Acer ES1-421 touchpad driver 

(( INSTALL )) Acer ES1-411 touchpad driver 

(( INSTALL )) Acer ES1-431 touchpad driver 

(( INSTALL )) Acer ES1-422 touchpad driver 

(( INSTALL )) Acer ES1-523 touchpad driver 

(( INSTALL )) Acer ES1-533 touchpad driver 

(( INSTALL )) Acer ES1-572 touchpad driver 

(( INSTALL )) Acer ES1-571 touchpad driver 

(( INSTALL )) Acer ES1-522 touchpad driver 

(( INSTALL )) Acer ES1-521 touchpad driver 

(( INSTALL )) Acer ES1-520 touchpad driver 


Featured Post

[2024] Best Acer Gaming Laptops Under $999

Nitro V 15  ANV15-51-57C8 Windows 11 Home, Intel Core i5-13420H 8-core processor 2.1GHz to 4.6GHz, NVIDIA GeForce RTX 2050, 15.6" Full ...

Search